

8 Lower Back Stretches for Flexibility and Pain Relief
Almost everyone experiences lower back pain at some point in their life. Unfortunately, lower back pain is one of the most common causes of missed work in the United States.
Whether your lower back pain is the result of spending too much time hunched over your work desk or lingering pain that resulted from an old injury, we are here to help!
To help you improve your overall flexibility and experience some much-needed lower back pain relief, we are going to go over eight quick and easy stretches. By incorporating these stretches into your daily routine, you will be able to strengthen, lengthen, and relax your lower back muscles!
1. Cat and Cow Stretches
If you have ever taken a yoga class, you have probably come across cat and cow poses. You can perform these stretches anywhere, and they help to open up the lower back.

Directions:
- Start on your hands and knees with a straight back.
- Tilt your head upwards and curve your spine downwards. This portion of the stretch is the cow phase. Hold it between 5 and 15 seconds.
- Return to the neutral starting point, where your back and neck are parallel with the ground.
- Now arch your spine towards the ceiling and drop your head and neck downwards to do the cat phase of the stretch. You should almost have the side profile of a scared cat, hence the name. Hold the pose for 5 to 15 seconds.
- Repeat these movements 10 times each, and you should experience some stretching and mild pain relief in your lower and middle back.
2. The Knee to Chest Stretch
This fairly simple movement can help with lower back pain by lengthening the muscles and reducing tension.

Directions:
- Lie flat on your back on a solid surface.
- With your knees together, bring both legs towards your chest. Wrap your hands around your knees and grip your shins just below the knee.
- Use your arms to pull your knees closer to your chest, but make sure your back remains flat on the ground. Try not to let your lower back lift off the ground or become rounded.
- Hold this position for 25 seconds to a minute. Once you have held it, release the knees and slowly let your legs return to the ground.
3. Child’s Pose Stretch

Here is another yoga classic that helps to stretch your glutes, hamstrings, and the muscles in your lower back. It provides quick pain relief, and you can perform it just about anywhere.
- Start on your hands and knees with a straight back.
- Sink your hips as far back as possible, trying to get your rear as close to your heels as you can.
- Your arms will naturally stretch out, which is what you want. Try to walk your hands forward as far as you can, without moving the rest of your body, as this will intensify the stretch.
- Hold the pose for 30 seconds to a minute and try to allow your back muscles and spine to lengthen and open up.
4. Lying Knee Twist
This unique movement helps to stretch the paraspinal muscles, which support your lower back. These muscles are often responsible for lower back pain, especially for people that arch their back for long periods at work.
Directions:
- Lie on your back with your legs extended straight and forward.
- Bend the right knee upwards and cross it over the left side of your body while keeping the left leg straight and forward.
- Hold the position for at least 20 seconds or until you feel a stretch through your glutes and lower back.
- Return to the starting position and then perform the reverse by crossing your left knee over the right side of your body.
5. Cobra Stretch
The cobra stretch is another pose that you will encounter during an introductory yoga class. It helps stretch tight abdominal muscles, as well as the stabilizer muscles in the lower back.

Directions:
- Start by laying on your stomach with your legs extended. Point your arms forward with your palms facing downwards and your elbows roughly in line with your shoulders.
- Using a slow movement, push your upper body upwards, resting your weight on your forearms. Your hips and legs should remain flat on the ground, and your back should be stretching upwards.
- Try to form a 90-degree angle between your upper arms and your forearms, which should still be flat along the ground.
- Hold the stretch for about 20 seconds before going flat to the ground again. You can repeat the movement until you feel your lower back stretching.
6. Back Extensions
This movement blurs the line between a stretch and a lower back exercise, as it helps stretch the muscles of the lower back while simultaneously engaging and strengthening your back and core muscles. It provides pain relief while also preventing pain from occurring in the future.
Directions:
- Lie face down with your entire body straight and flat.
- While keeping your feet, legs, and hips flat against the floor, use your glutes, abdominals, and back muscles to lift your head and chest off the floor.
- Try to squeeze your shoulder blades together and keep your head facing the floor throughout the movement.
- Hold the pose for a few seconds, then lower your body in a controlled manner. Repeat 5 to 10 times with rest between reps.
7. Bridge Pose Stretches
This stretch involves using the glute muscles and hamstrings to elevate the body and stretch the lower back.
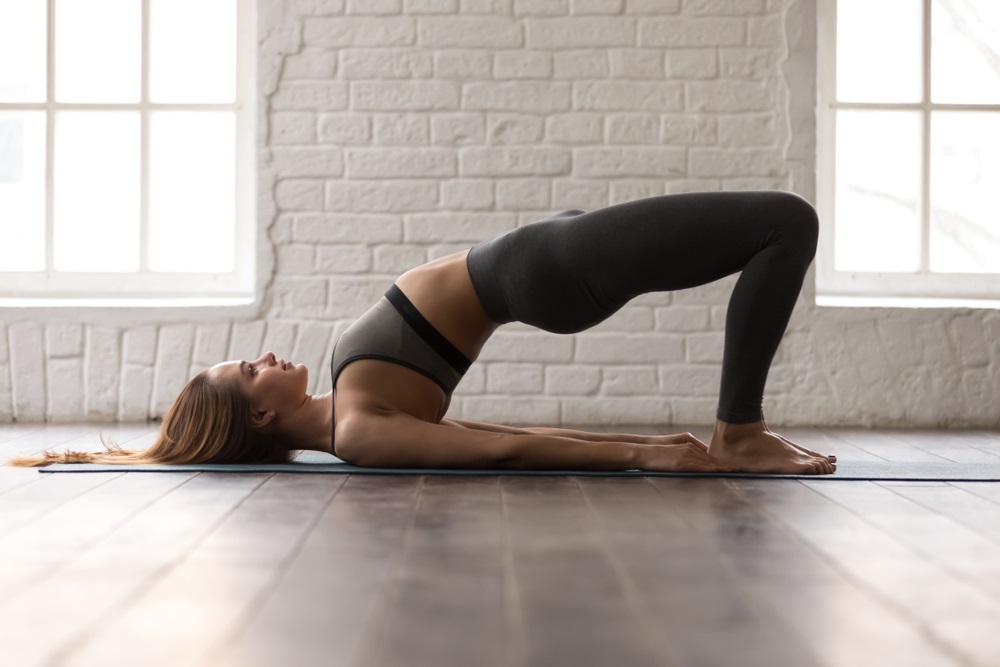
Directions:
- Lie with your back flat on the ground, but your knees bent upwards and your feet roughly hip-width apart. Keep your hands flat on the ground for stability.
- Pushing down through your planted feet, lift your lower back using your glute muscles. Your hips should be in line with the shoulders and knees until your body is flat and almost bridge-like, explaining the name.
- Hold for 15 seconds before lowering your body in a controlled way. Repeat several times.
8. Seated Spinal Twist
This stretch is popular with athletes as it helps to increase mobility, and it opens up the core muscles, including those in the lower back.

Directions:
- Sit on the floor with your legs extended outwards.
- Bend your left knee and place the left foot on the outside of the right thigh.
- Place your right arm outside of the left thigh and your left hand behind you for support.
- Twist to the left and start the movement from the base of the spine.
- Hold the post for 45 seconds to a minute, and then repeat the pose on the other side.
Final Words
Use the stretches above to improve flexibility and reduce pain. If you find that stretches do not help, you might be dealing with a serious injury. You should consider contacting your doctor if the pain lingers and is impacting your quality of life.